Fuel Fall Season Success With Automated Workflows and Improved Customer Experience

As the fall season rolls in, we’re excited to introduce a range of new features in Blueprint that will make your life easier. These updates are designed to automate your workflows, keep your data neatly organized, and elevate your customer experience. So, without further ado, here are our new features.

Structure your workflow with Organizations
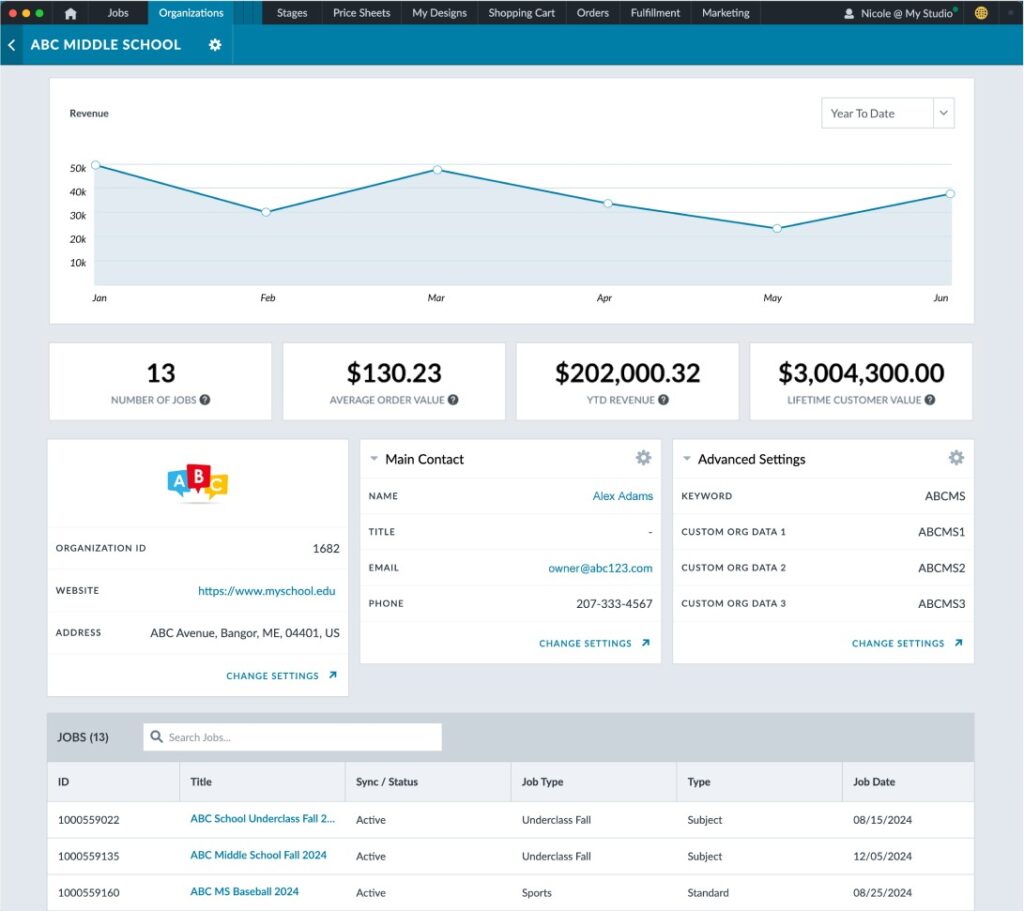
Imagine having all your jobs neatly categorized by their respective organizations, like School District A, School District B, or Client C. It would be a dream, right? No need to pinch yourself awake.

With our new Organizations feature, you can easily group jobs under specific organizations, making it simple to view and manage them from a single dashboard.

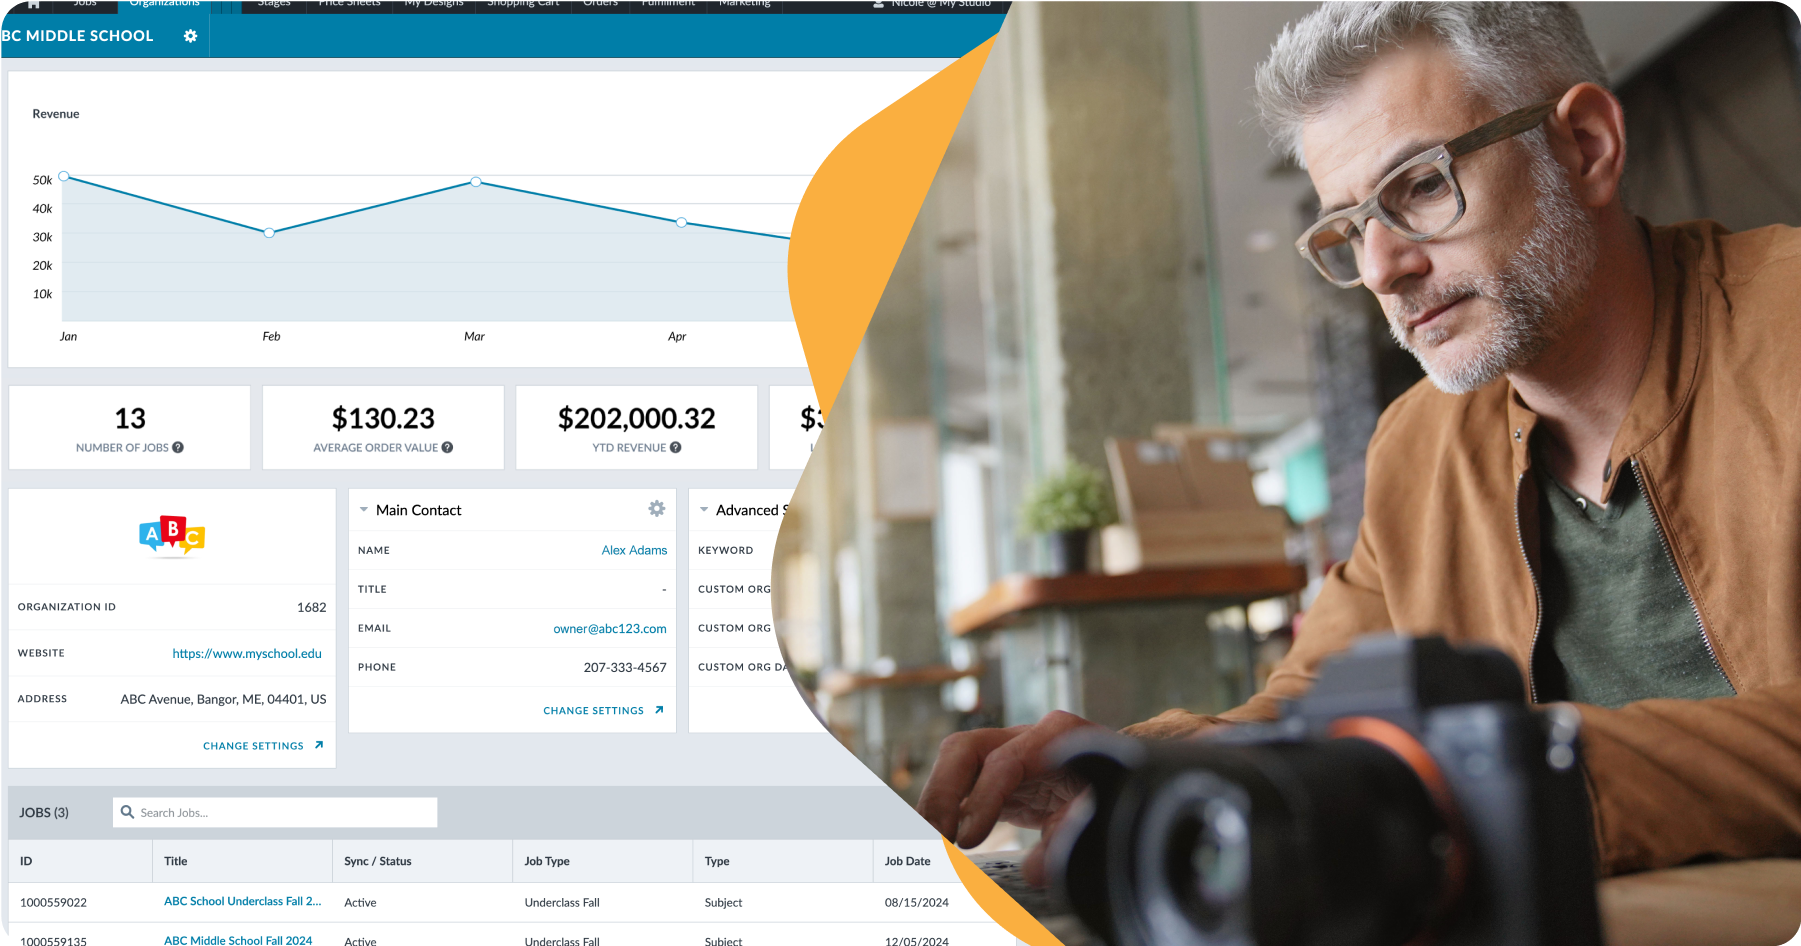
While adding Organizations is optional, it’s a game-changer for studios handling schools, leagues, or clients. You can navigate to the new Organizations tab, right next to Jobs, and view all associated jobs and analytics at a glance. This feature helps you stay organized, minimizes confusion, and makes data retrieval a breeze.
Automate job stages effortlessly

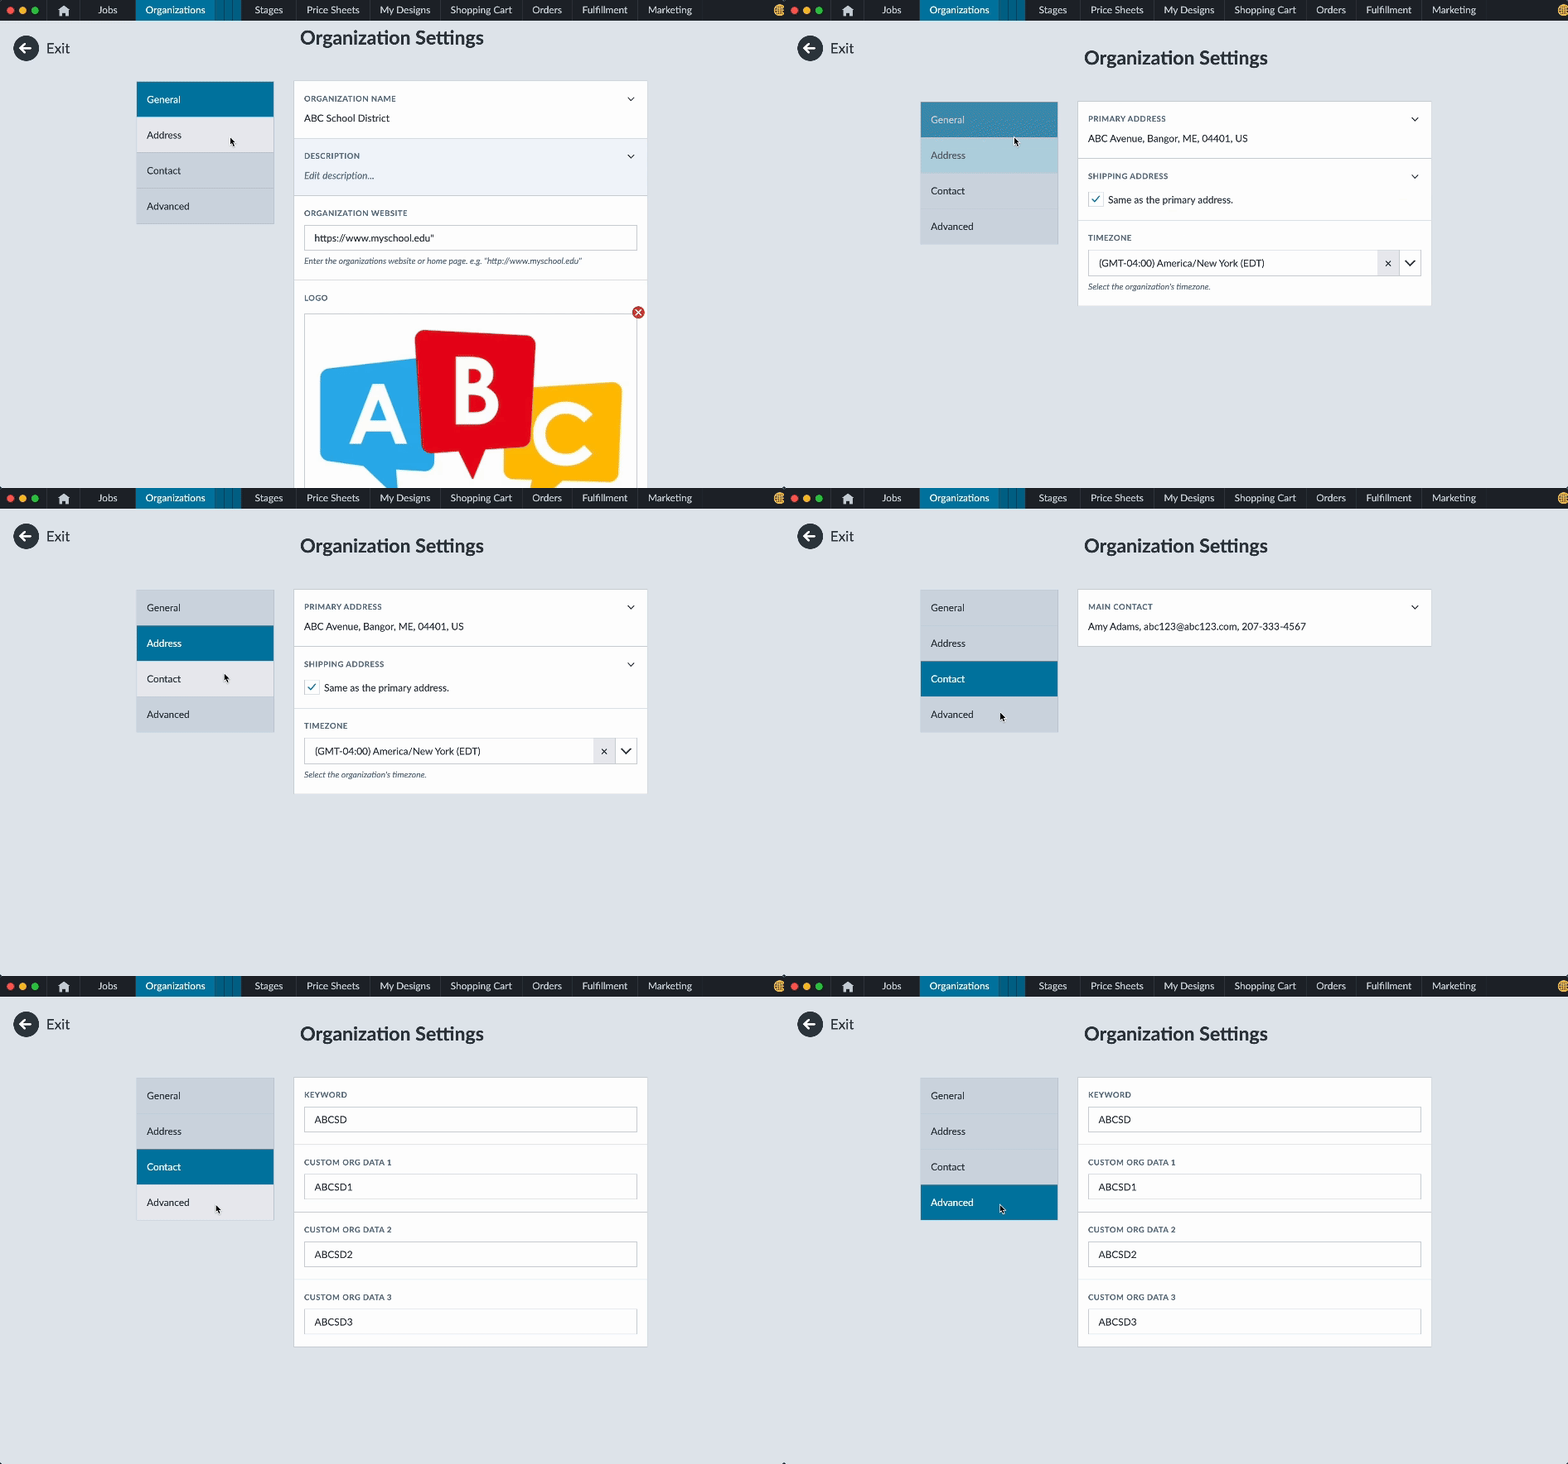
Tired of manually adjusting job settings as they progress? Our new Stages feature is here to help. You can create templates to move a job through various stages automatically, eliminating the repetitive task of changing settings every step of the way.

Under the new Stages tab, you can set up templates that define Duration, Shopping Cart Template, Shopping Cart Visibility, Price Sheet, Custom Forms, and even Pre-order flags. Once set, these templates are applied to jobs, ensuring each job flows smoothly through its lifecycle without manual intervention. If you need to make adjustments, you can pause, extend, restart, or revert a job back to gallery settings at any time.

Did you know

A Pause stage is a handy way to temporarily stop an active session for good reasons, like keeping visitors out of a shopping cart before it’s ready, giving the studio time for post-production, or collecting more gallery visitor emails. You can also hit pause on a job’s stage automation to take care of any unplanned issues that might come up and resume stage automation once you are ready.

Keep your workflow intuitive with Custom Image Attributes

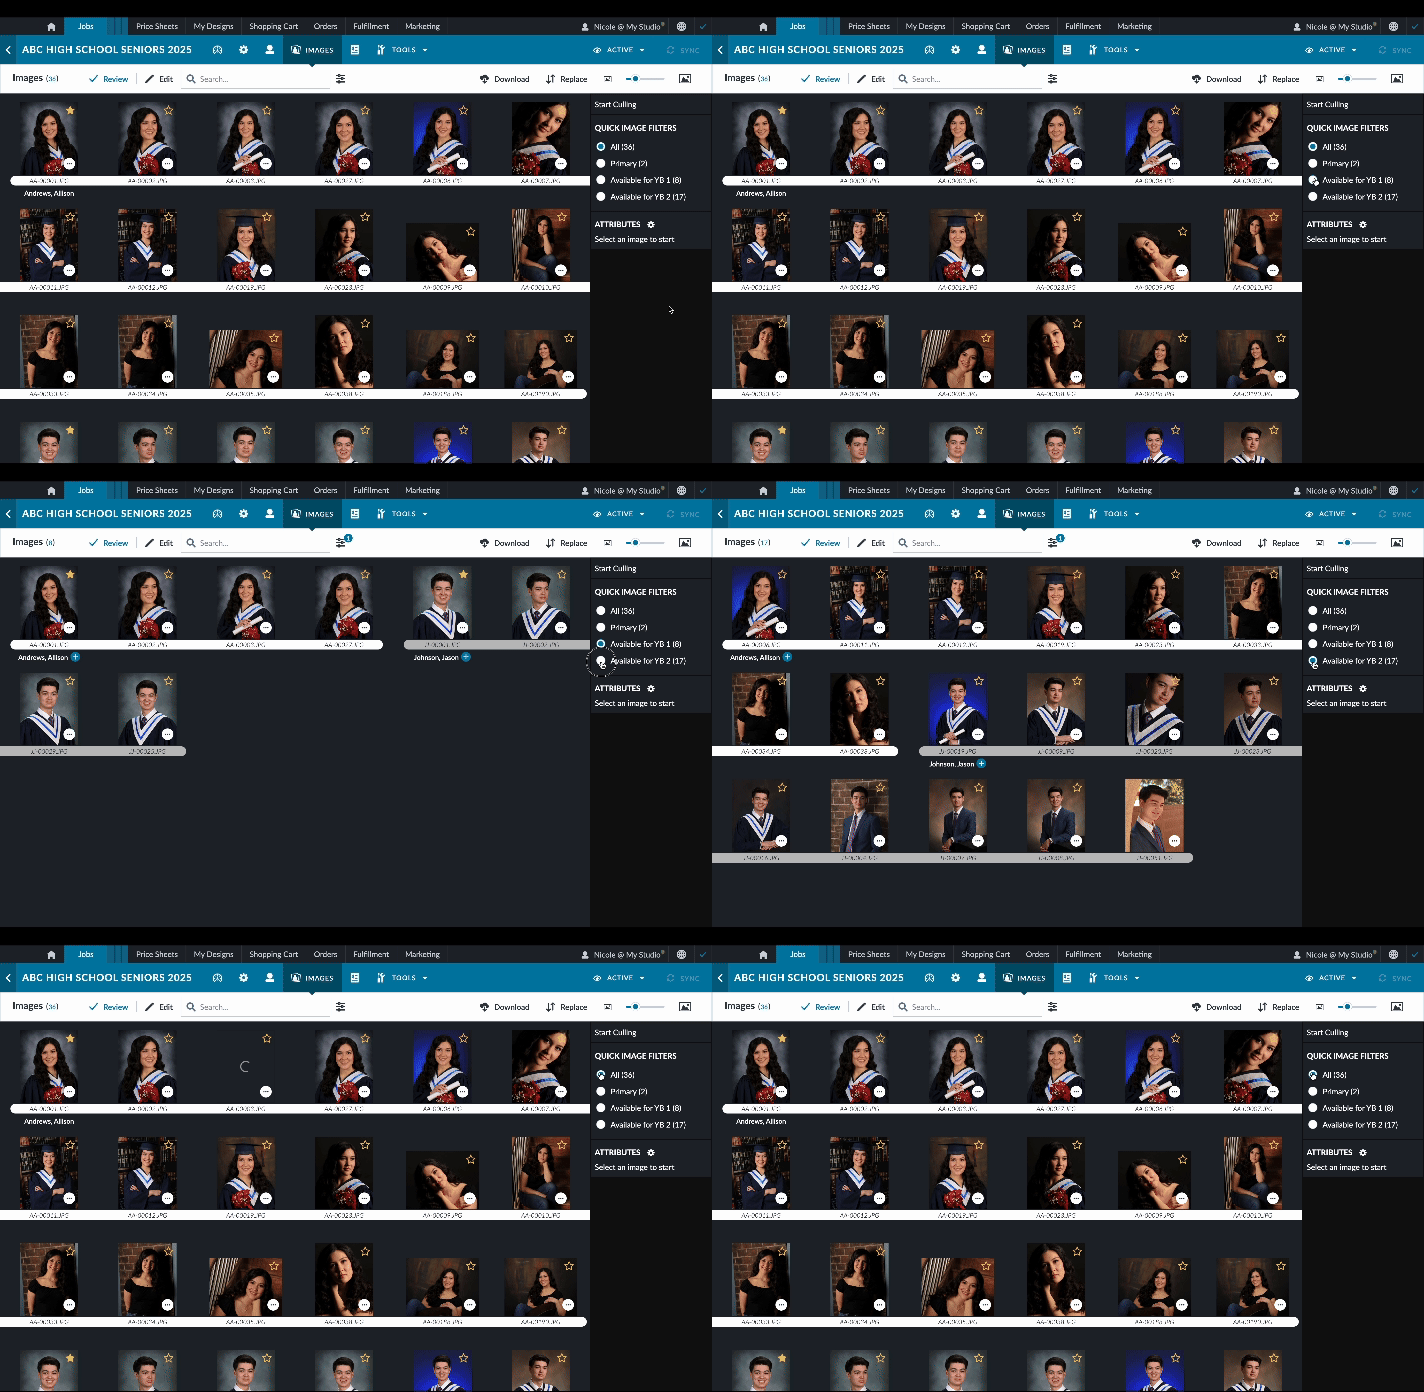
Let’s talk about speeding up the culling process. With Custom Image Attributes, you can define your own attributes for image identification, making it easier to filter and tag photos within Blueprint. Under Jobs > {Job Name} > Images, you can set these attributes and quickly filter through thousands of images.

This means less time scrolling and more time doing what you do best. By keeping tagging and filtering within Blueprint, we’ve eliminated the need for third-party tools, keeping everything in one place for maximum efficiency.

Simplify your Yearbook pose process

We know how tedious it can be to manage yearbook photo selections, especially when you have to manually sift through images to find the right poses. Our new Yearbook Selections feature allows studios to streamline this process by creating a set selection of images for customers to choose from.

For example, if a senior shoot includes multiple poses, but the school requires a specific cap and gown photograph for the yearbook, you can easily handle this in Blueprint. Simply select Jobs > {Job Name} > Settings > Yearbook > Number of Poses, and tag the appropriate images with “Available for YB 1.” This way, the student or parent can only select from the designated images, reducing errors and saving time during peak season.
Get a clear view of your earnings

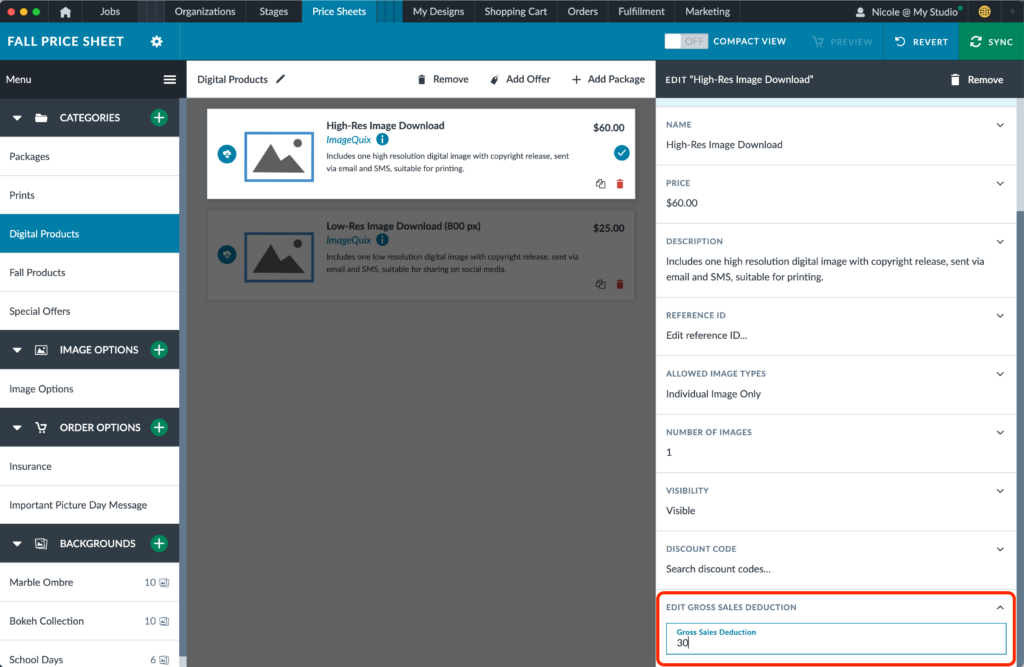
Tracking orders, sales, and commissions just got a whole lot easier with the Job Order Summary Report. This feature gives you a comprehensive overview of order counts, total sales, shipping, handling, fees, and services – all across a specific date range.

Do you share a percentage of job sales profit with your schools? We know how much of a headache it can be to try and calculate commissionable sales, especially when the cost of specialty products, like mugs or mousepads, reduces your actual profit compared to prints. Now you can add a “gross sales deduction” to any product, package, or digital, which will lower the net sales total in the Job Order Summary Report.
Add a personal touch to your receipts

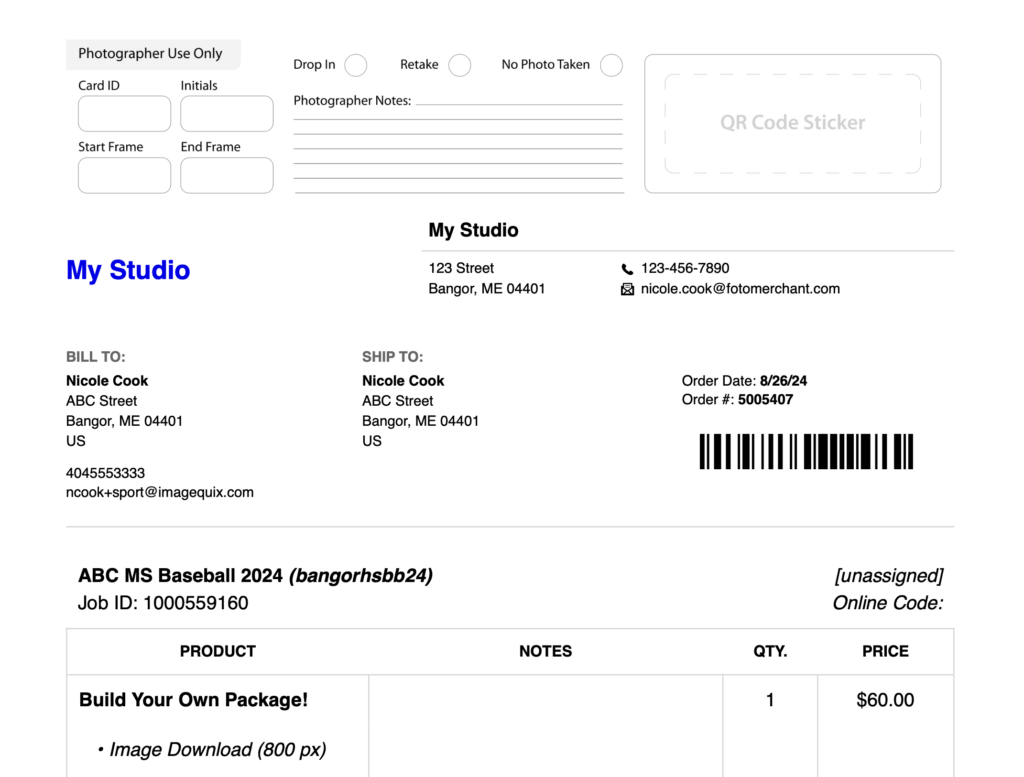
Want to add a bit more flair to your pre-order receipts? With Custom Receipt Graphics, studios can personalize receipt graphics to include photographer notes or a QR code for easy access to additional resources or promotions.

To add a custom graphic, head over to Shopping Cart > Manage Cart Templates > New Shopping Cart > Pre-Order Custom Receipt Graphic. It’s a simple way to add a unique touch to your receipts, enhancing the customer experience while providing valuable information.
Work smarter, not harder

This fall, we’re giving you the tools to work smarter, not harder. From organizing your jobs by organizations to automating workflows with stages, adding custom image attributes, simplifying yearbook selections, and gaining clarity with job order summaries, these features are designed to elevate your studio’s efficiency and increase customer satisfaction. It’s a win-win for everyone. 

Ready to try these new features? Log in to Blueprint today and start transforming the way you work this fall season. 

If you aren’t yet one of our brilliant Blueprint users, our team is ready to help you join.
Sports: Your Winning Workflow

In the spirit of the recent Olympics, it’s time to bring the same gold-medal mentality to your sports photography business. Whether you’re capturing the thrill of a soccer goal, the intensity of a football tackle, or the elegance of a gymnast mid-routine, having the right tools can save you both time and money. Recently, we hosted a webinar with industry pros Mike Norkin, Co-Owner of Cherished Memories Photography, Alex Ela, COO/Co-Owner of Cherished Memories Photography, Dave Stock from team DSP, and our very own president, Tim McCain.  

Can’t wait? Here’s a play-by-play of what the team discussed. 

Blueprint: The all-around champion

Unlike other software that pigeonholes you into a single method of data ingestion—such as QR codes or facial recognition—Blueprint offers a whole toolkit of options. Whether you’re shooting tethered on the sidelines, using barcodes at the track, or leveraging cutting-edge facial recognition technology on the court, Blueprint has you covered. This flexibility allows you to tailor the system to suit each unique game, match, or tournament, ensuring that your workflow is as smooth as a well-practiced baseball swing.

In our recent chat, Mike Norkin shared how Blueprint allowed him to reduce his staffing needs by 30%, scoring a significant victory in cost savings. Imagine cutting $30,000 in production labor simply by refining your process! Now that’s what I call a winning strategy. 

QR Codes

QR codes might seem like old news, but we’ve reimagined them as a powerful tool for the modern sports photographer. The ability to design custom QR codes in Blueprint that seamlessly integrate into your workflow means each image is accurately sorted and linked to the correct athlete.

Pro Tip: Print your QR codes on half-sheets, leaving room for essential details like phone numbers or email addresses. 

This simple adjustment can dramatically improve accuracy and ease of use in the field. And if you’re concerned about the codes not being read correctly, don’t be. By having athletes hold the QR code flat against their chest (think of it as their gold medal photo op!) and using clipboards to keep everything steady, Blueprint delivers nearly perfect accuracy in sorting images.

Facial Recognition

In the Olympics, innovation often leads to victory, and in the world of sports photography, facial recognition is that innovation. Facial recognition allows for private, unique galleries for each athlete, which is particularly useful for action shots or events where traditional data collection can be tricky.

Facial recognition can transform previously unsellable images, like those candid action shots, into marketable memories. By registering an athlete’s face in the system, every image featuring that athlete throughout the season can be automatically sorted into their gallery, making it easier than ever for parents to purchase those winning moments.

A Victory for your bottom line

In any sport, having the right equipment is crucial, but it shouldn’t break the bank. Unlike older systems that require significant investments in hardware, Blueprint runs smoothly on mid-level computers, meaning you don’t need to spend thousands on equipment to get started. For smaller teams or businesses just entering the game, this is a huge advantage.

And let’s not forget the savings in labor costs. Dave Stock shared how switching to Blueprint reduced his labor expenses from $110,000 to just over $20,000 in one season. That’s a significant difference, and the ROI on Blueprint was almost as quick as an Olympic sprinter.

Winning the Marketing Game

Blueprint isn’t just about capturing and sorting images—it’s also a powerful marketing tool. By integrating QR codes and metadata into your workflow, you can streamline the shooting process and the sales process. 

Imagine shooting a basketball game at 3 PM and having the images online and ready to sell by 7 PM. That’s the kind of efficiency Blueprint offers.

One creative use of QR codes discussed in the webinar was printing them on yellow paper for pre-paid orders and white for non-buyers. This simple color-coding system helps photographers prioritize who to shoot first and ensures that every potential customer gets their photos, even if they didn’t pre-pay. It’s like having a playbook that guarantees you hit every key moment.

Your gold medal moment

Whether you’re on the sidelines or courtside, Blueprint has the tools to help you perform at your best no matter the sporting event. 

It’s time to step up your game, streamline your process, and capture those gold-medal moments with Blueprint. Your workflow—and your bottom line—will thank you.

A Blueprint for the future

Blueprint is the core platform

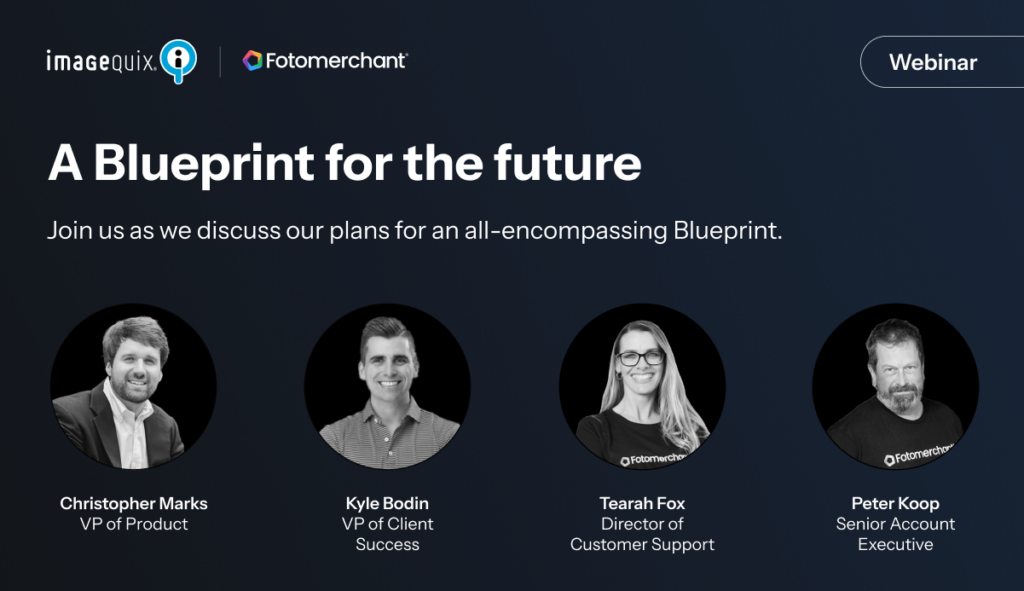
We have exciting news: ImageQuix is consolidating all its high volume brands into one seamless platform. Going forward, Blueprint, ImageQuix’s flagship platform, will become the core platform. We’re all collectively thrilled to be a part of this endeavor.

Why are we consolidating platforms? By pooling our efforts, we’re unlocking a new world of possibilities for the high volume industry. Watch this space.

With our combined team, we’re now poised to grow your studio like never before. This blog will scratch the surface of what we discussed in the webinar. So, to get all the exciting details, check out our recent webinar by clicking the button below.

Don’t miss out; this webinar will only be available on-demand for a limited time.

A new era

We know that transitioning to a new platform can be daunting, but we’re here to support you every step of the way. Our migration pathway ensures a smooth transition with personalized onboarding sessions, dedicated customer support, and comprehensive training resources. 

We’re committed to making this journey as seamless as possible so you can confidently embrace all Blueprint offers. If you have more questions regarding your migration, contact migration@imagequix.com or speak to your team via Slack. 

What can Blueprint offer?

Our new unified team has been busy. Working to bring over the best features Fotomerchant and Simplephoto have to offer to complement the robust feature set Blueprint already has to offer and has in the works.

Let’s take a quick look at some now:

Open API

Coming soon: Blueprint will be introducing an open API. Our Fotomerchant users are already familiar with an open API, and it was important to ImageQuix to migrate this capability over. This feature allows you to seamlessly integrate Blueprint with third-party applications, systems, and services, offering a slew of possibilities for customization.

Unleash your Creativity with My Designs

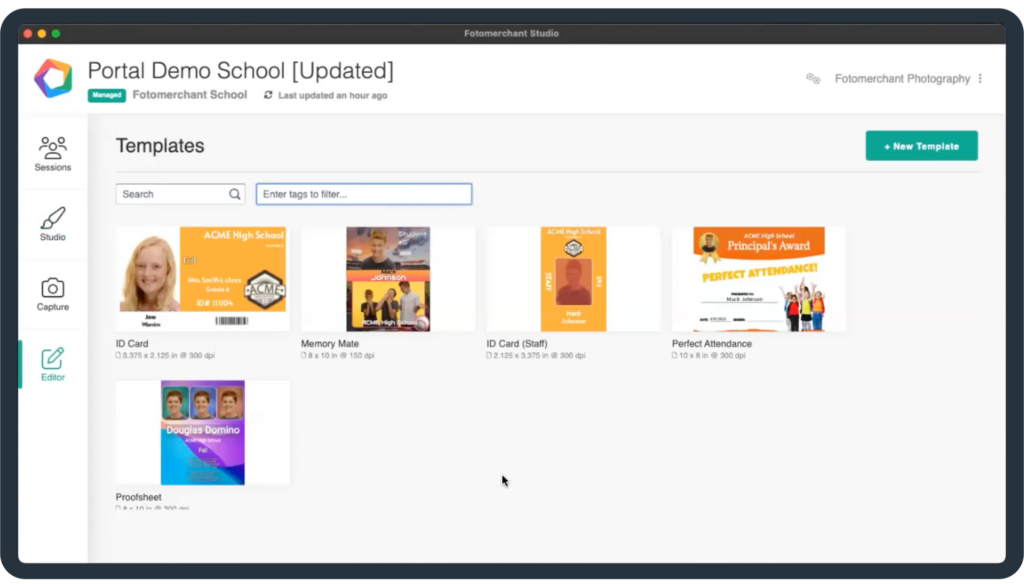
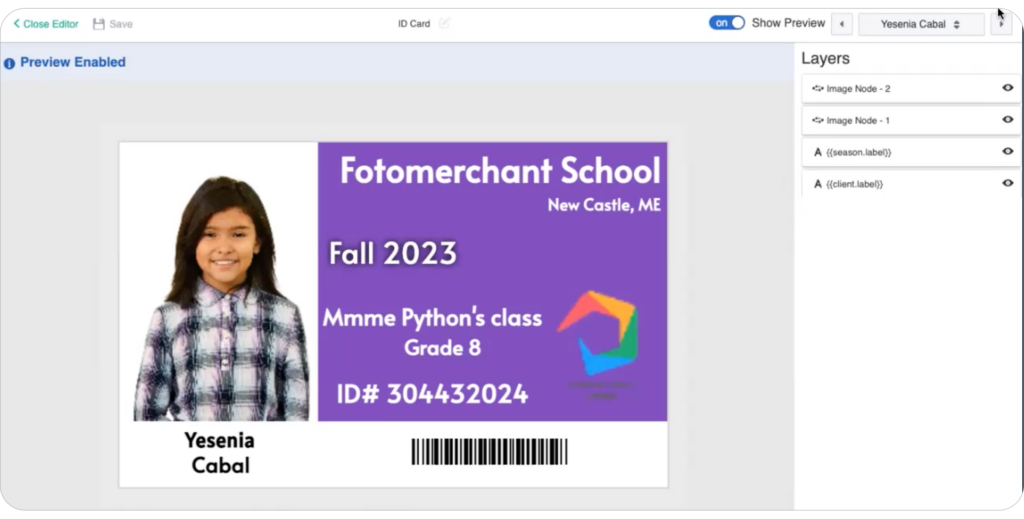
Introducing My Designs, a revolutionary feature that will change how you interact with your print templates (ID Cards, Memory Mates, etc.). This tool offers a dynamic, intuitive interface that makes customizing your print templates a breeze. Incorporate subject data into your unique designs, bringing your vision to life with precision and ease.

For Fotomerchant users migrating to Blueprint, this will be a great new addition to your tool kit. 

To learn more about My Designs, click here

Dynamic Tax

Blueprint also simplifies financial processes with dynamic sales tax calculations. This feature automates the calculation of sales tax based on location, transaction type, and other relevant factors, saving you time and reducing the risk of errors. This means fewer headaches and more time to focus on growing your business. Nice.

Want to learn more about what Blueprint can offer you? Perfect timing. ImageQuix’s MVP 2024 Conference is right around the corner. See our recent MVP blog here.

Mark your calendars and join us in Las Vegas, where industry leaders and innovators will come together to collaborate, shape the future of high volume, and enrich our industry with illuminative insights. 

Looking towards the future
We’re ready to grow your studio like never before.

As our unified team works together, we’re leveraging decades of industry knowledge. With some of the most visionary minds in the industry now in one place, we’re excited to see what we can build. As always, the success of this industry is at the forefront of our goals. We want to empower the high volume space with cutting-edge solutions and insights. 

Stay tuned for more updates as we continue to innovate and redefine the standards of the high volume photography industry. 

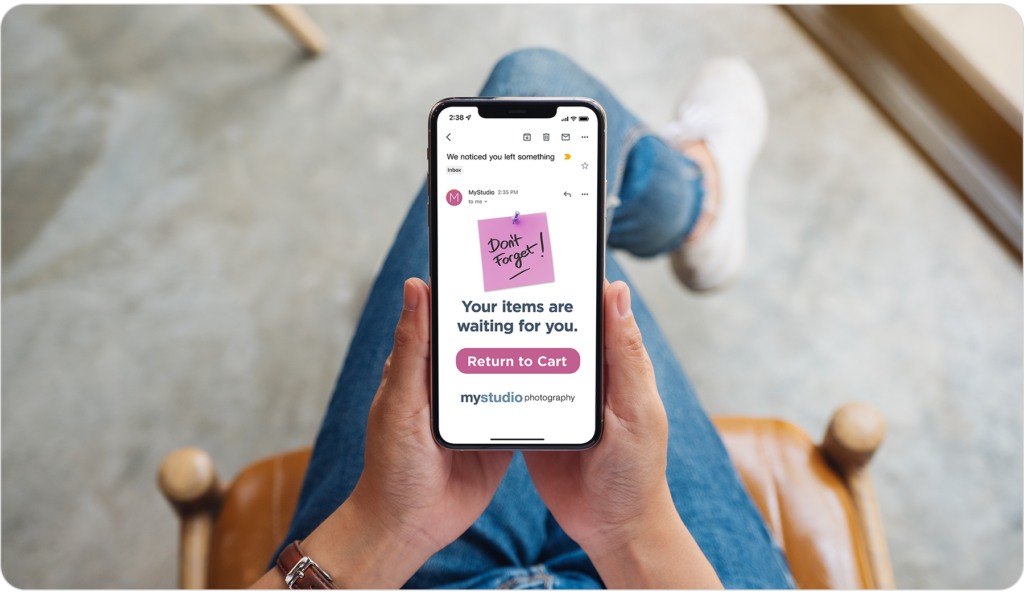
Abandoned Cart Makeover

Unlock the Power of Abandoned Carts

Who doesn’t love a good makeover? Today, we’ve got a behind-the-scenes look at the glow-up we’ve given to our abandoned cart campaigns. In this blog, we will reveal why abandoned carts are a big deal. We’ll highlight the juicy customer data that fueled our decisions and the changes we’ve made to amp up your customer’s shopping journey and ultimately lead to more conversions. 

The Revenue Boost You Didn't See Coming

We took a deep dive into our customers’ email marketing performance this year, and what caught our attention were those abandoned carts – baskets of potential revenue left stranded in the digital aisles. We saw an opportunity to turn things around and decided to make data-backed changes that could bring these abandoned carts back to life.

Abandoned carts aren’t just missed transactions; they are a goldmine of insights into your shopping habits. Want to learn more about what an Abandoned cart email campaign is? Lucky you, we’ve got a whole blog on the topic. Click here to view.

The Mission

Our mission became clear: to optimize our abandoned cart campaigns based on real data. We believed that if we could align our studio’s campaigns with industry standards for design and workflow, we could not only recover lost revenue but create a shopping experience that truly resonates with your customers.

We’ve now also instated split testing into our abandoned cart rollout. Things change so it’s important to have a dynamic response to customer shopping behavior. With this in mind, we’ll constantly be theorizing, testing, and improving the abandoned cart emails.

The Data Is In

We compared customer conversion data between August 1st, 2022 – October 15th, 2022, and August 1st, 2023 – October 15th, 2023. Looking at the same period year over year ensured we took into account the seasonal nature of the industry. So what did we find? Our updates to the campaigns worked! For 2022, the average viewed conversion rate from opening an abandoned cart email was 21%; in 2023, this rose to 24%. 

What do we mean by conversion rate? For the data outlined in this blog, we looked at customers who received the abandoned cart email and made a purchase shortly after. 

This data took into account a range of different studios that use Fotomerchant. With the demographics of the studio customer base undeniably impacting the data, some studios saw more of a change than others. For example, one of our studios saw a 9.11% increase in abandoned cart conversions between 2022 (14.19%) and 2023 (23.30%). Whereas another studio in a different part of the country only saw a 2% increase in conversion from the updated campaign. Progress is still progress! As we continue to track and update these campaigns, we’re interested in digging deeper into the demographic influence on abandoned cart email conversions. 

The Data-Driven Evolution

What exactly have we changed? Everything from the timing of our emails to the design elements – it’s all been meticulously crafted to scoop up those extra sales. Let’s break it down:

Initial Email: Now sent a mere hour after customers have shown interest in those must-have items. We’re striking in the moment.

First Reminder: A friendly nudge 23 hours later for those moments when life gets in the way.

Second Reminder: If they’re still contemplating, there’s another reminder three days after the first.

But here’s the exciting part – our changes aren’t static. Oh no, we’re running a split test. The Control group gets personalized copy, while Variation A showcases subtle design tweaks. Why? Because we want to know what resonates with your customers the most.

Data-Informed Customer Marketing

What sets our approach apart is the magic of data-informed customer marketing. We’re not shooting into the dark; we’re using your data to hit the bullseye. By understanding your customer’s behaviors, preferences, and even hesitations, we’re crafting an email that leads to conversions. It’s just that simple.

To learn more about how you can supercharge your revenue with the use of abandoned cart emails, book a demo using the button below:

Lab Bridge

We are thrilled to introduce our brand-new Lab Bridge integration, a powerful addition to the Fotomerchant suite. The Fotomerchant Lab Bridge, designed specifically for Windows, will make your lab’s integration with Fotomerchant smoother and more efficient than ever before.

The primary role of the Fotomerchant Lab Bridge system is to add Fotomerchant orders to DP2. The Lab Bridge populates Fotomerchant orders in DP2 with Fotomerchant’s sophisticated cropping systems translated cleanly to crop data in DP2.

Fotomerchant has worked closely with the DP2 team when building the Lab Bridge to ensure that the system integrates with DP2 in the best way possible. Lab Bridge can send orders directly to DP2 or using DP2 command files.  

So, how is Fotomerchant’s Lab Bridge better and faster?

Better

  • Better green screen product population! Subject images and backgrounds are added to different layers in the DP2 layout, so image adjustments don’t affect the background.
  • Single and multi-node products

Faster 

  • New lab setup to first test order in DP2 in as little as one hour.
  • Import DP2 products into Fotomerchant’s Lab Portal, either in the lab or studio catalogs.
  • Populate image retouching in DP2: KPARS, Retouch flag, and Retouch Instructions.
  • When images have completed retouching in DP2, Fotomerchant Lab Bridge can automatically upload retouched images back to Fotomerchant. 

Impressive right? Let’s unpack that further.

Efficiency Meets Simplicity

With Lab Bridge, process single drop ship orders as individual DP2 orders or send a batch of orders as a single DP2 order batch to your lab. It also combines multi-child orders into a single DP2 order, allowing your lab to handle them efficiently. 

Lab Bridge can populate DP2 Subject Info using subject data stored in the Fotomerchant platform. It’s flexible! Product personalization can be populated through customer text entry in the Fotomerchant shopping cart or via DP2 macros using DP2 Subject Info.

Seamless Integration with DP2

We are able to import DP2 Remote Catalog exports to ease the process of getting your lab’s products into our Portal platform. Lab Bridge can also facilitate updating order ship dates and tracking information from DP2 to Fotomerchant and automatically upload retouched images in DP2 back to Fotomerchant. 

Customization Made Easy

There are little to no custom scripting or integration software projects required for most DP2 labs. The Fotomerchant Lab Bridge offers a high degree of customization to facilitate common lab workflows. Labs requiring custom functionality can use the Lab Bridge system with the powerful Fotomerchant API.

Unlike other online sales platforms, Fotomerchant’s Lab Bridge system correctly populates products with Green Screen background selections.  Instead of the subject image and the background being flattened, subject images and backgrounds are added to different layers in the DP2 layout. This is an important feature, so subject image adjustments don’t affect the coloring of the background.

Effortless Asset Delivery

The Fotomerchant Lab Bridge system also facilitates the delivery of several different types of assets from the Fotomerchant platform to your lab. XML billing data that is compatible with the LabWorks billing system can be routed to any folder on your lab’s network. Customer PDF receipts and detailed supplier HTML receipts can be saved for each order.

Discover a better way to handle your orders, and let the Lab Bridge transform your lab workflow for the better! Hold on, we aren’t done yet. Lab Bridge is continuously updated to make your lab’s workflows for processing Fotomerchant orders more efficient. 

The Data on Digitals

Here at Fotomerchant, we’re fueled by data. Always hungry to learn more about parent buying habits, we believe that without data, you’re only guessing. With digital products’ popularity increasing, we turned our inquisitive eye towards this trend. In today’s digital age, including digital photos in your product offerings is no longer optional; it’s necessary. If you don’t do it, your competitors will, and we can’t let that happen, can we?

This blog is the second installment of our two-part series uncovering the potential of digital products. Before we begin, we’d like to clarify that when we say ‘digital product,’ we mean image or video files captured digitally and distributed electronically. Click here to learn more about what makes our digital delivery particularly powerful.

Now, let’s dive head first into the digital delivery data. The following data was captured in our School Photography Industry Report. Over the past two years, we’ve surveyed over 74,000 parents. Through our survey, we’ve noticed the digital shift reshaping the school photography industry. Here’s what we’ve learned.

How Do Parents Use Their School Photos?

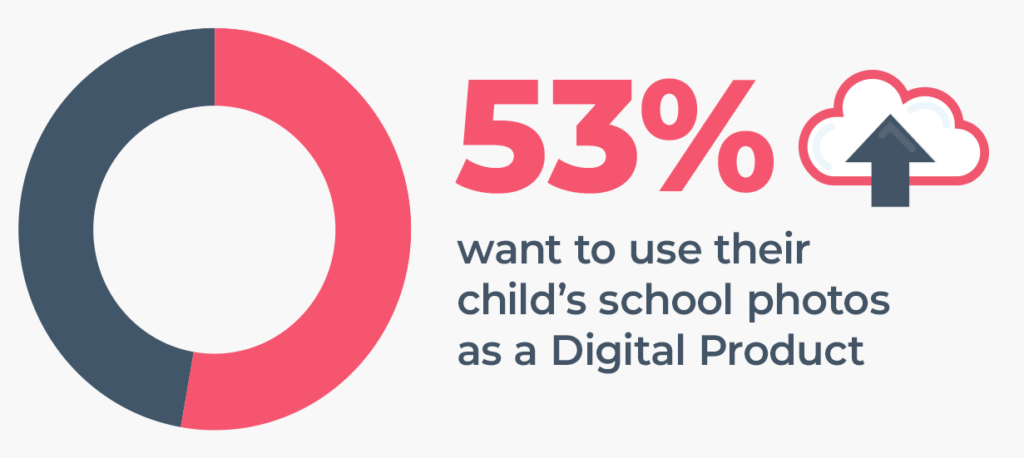
The data speaks loud and clear. Parents want digital photos. A staggering 53% of parents now want to see their child’s school photos as digital products. Yep, that’s over half of all parents!

Why? 33% of parents want digital images to share on social media. They’re not just collecting dust; these images are used to share with friends and family digitally. It’s the new norm, people!

What Parents Want in a Package

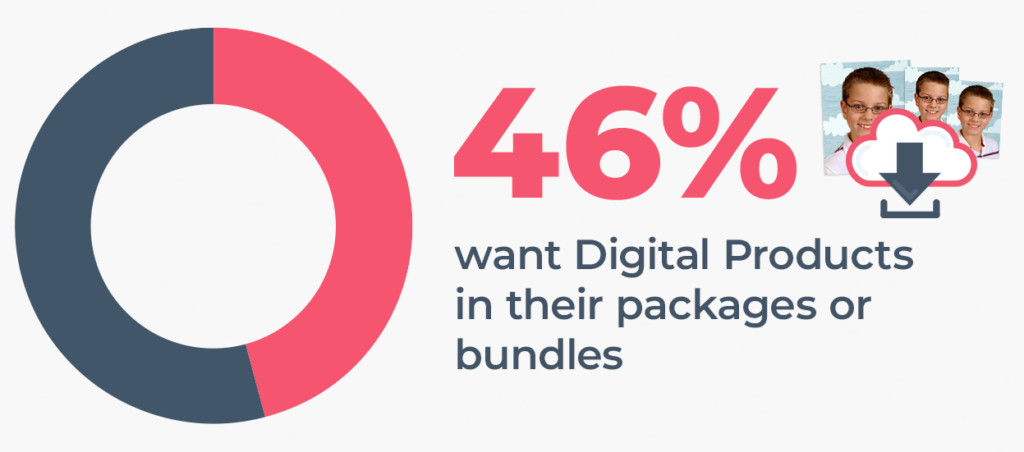
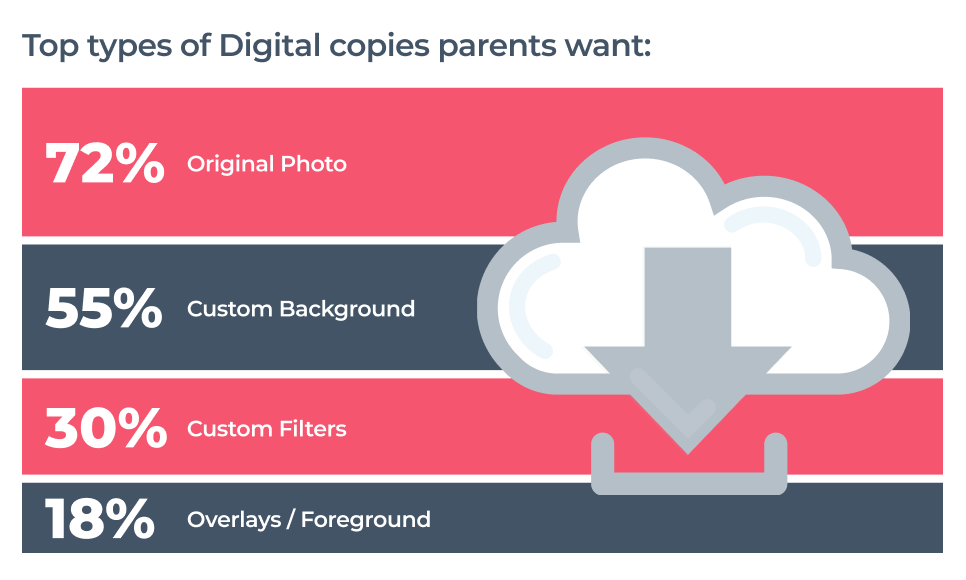
What do parents want in their school photo packages? Well, 46% of parents want digital photos included. Adding digital products to your catalog increases the overall perceived value of your other physical offerings. It’s a no-brainer!

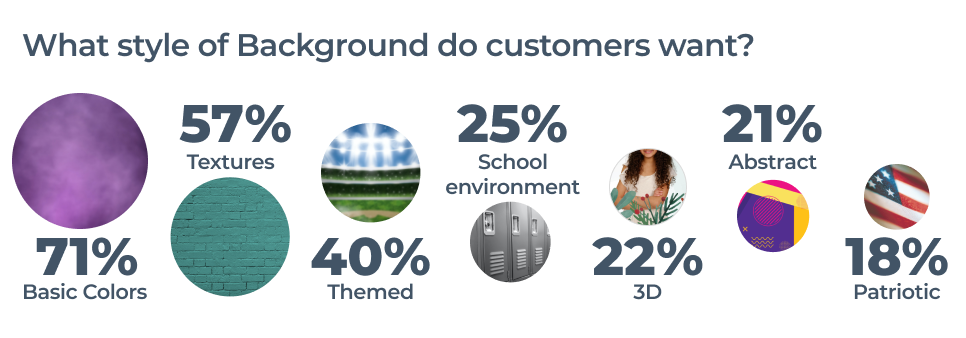
But it’s not just about throwing in some pixels; it’s about customization. Custom backgrounds are all the rage, with 55% of parents wanting the option to choose backgrounds that resonate with them. Customization is key to making parents happy, whether it’s solid colors, textured backgrounds, or themed settings.

The data doesn’t lie; providing various options can be a game-changer. About 71% prefer solid colors, 57% love a bit of texture, and there’s a strong demand for themed backgrounds that reflect holidays, sports, and school environments.

This is a great way to increase your revenue, upsell by offering customization options, such as custom backgrounds, and watch your sales soar.

Another exciting opportunity to supercharge your offerings is through creating digital bundles. Release them at different times throughout the year to keep your customers engaged and excited about ordering more photos. 

Offer new themes, backgrounds, or exclusive deals to entice parents to come back for more.

How Much Are Digital Products Worth?

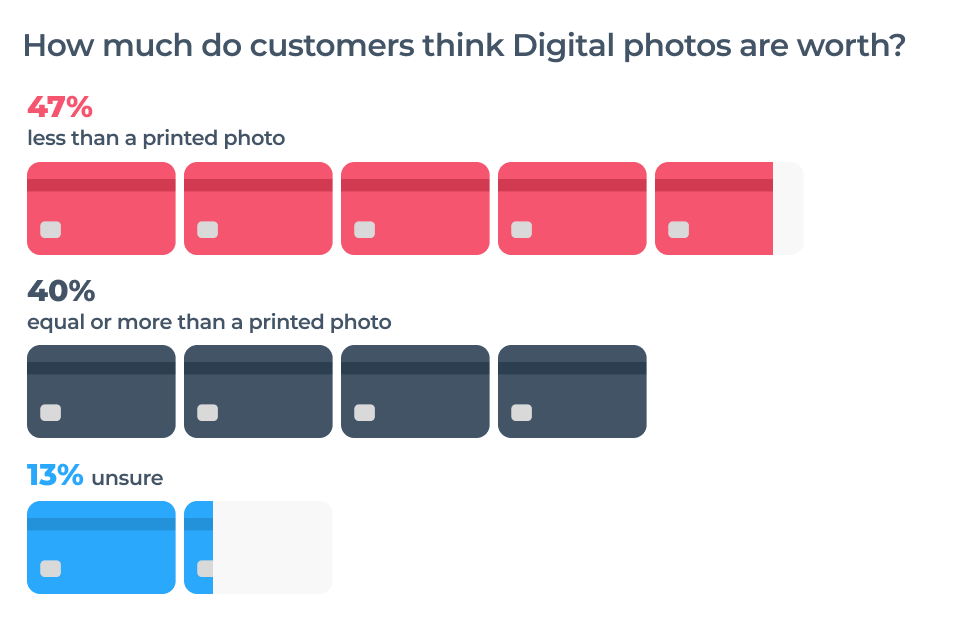
Now, the big question: How much are digital products worth? The data reveals that 40% of parents believe digital photos are equally or more valuable than physical prints. Whereas 47% value digital prints as less than a digital photo. The pricing strategy here is crucial. We recommend experimenting with different price points and packaging to find what resonates with your customer base.

Give ’em freebies! We’ve uncovered some interesting data around the value of “free items.” By including a free digital item in select packages or bundles, you can enhance their perceived value. This strategy can attract customers to your best-selling offerings and boost sales for packages that may have previously underperformed. 

So there you have it, folks! The digital wave is here, and it’s time to ride it to boost your revenue and cater to your customers’ evolving preferences. Have any follow-up questions? Don’t hesitate to reach out to us for support. Thanks for joining us, and until next time, keep capturing those memories!

Studio 101

Unveiling the Magic of Studio 101

Grab your cameras and buckle up. We’re about to take you on a thrilling adventure through the world of Studio. Whether you’re a total newbie or a seasoned pro, this blog guides you through the basics and shares some of the exciting hidden gems that Studio has to offer. This will be a very high-level look at Studio. To see a more in-depth demonstration, watch the webinar by clicking the button below.

Ready to make your workflow better and faster than ever before? Let’s dive in.

Studio’s Exciting Updates

Hold onto your hats, folks. We’ve been hard at work adding some seriously cool new features. There’s recently been a flurry of wonderful additions that are about to make your Studio experience even better. 

Don’t get us started on the fresh look of the interface; it’s got everyone talking! Whether you’re excited about the new facelift or just eager to explore new functionalities, there’s something in store for everyone. Click here to view the down-low on all Studio’s recent updates.

Exploring the Basics

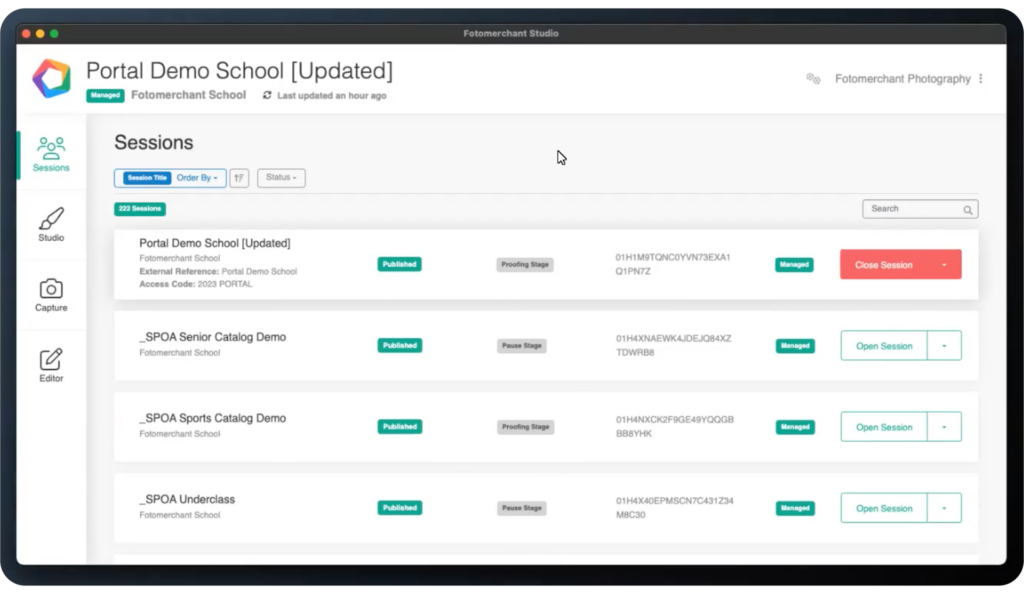
As you step into Studio, you’ll find yourself faced with sessions. Think of these as folders that neatly hold your individual photography jobs, complete with subject data and their images. The best part? No fumbling around with buttons; you can jump straight into a session just by clicking anywhere on it.

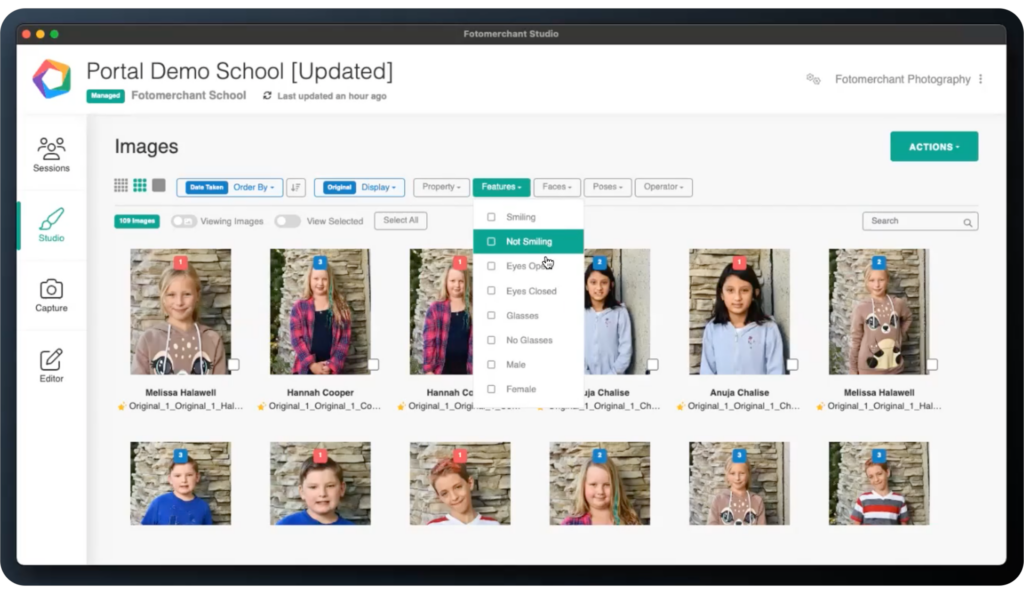
Once you’re inside a session, this is where the real magic happens. Here, you can see images, subjects, and groups. Once in the subject area, sort through your images with our clever layered filters. You’ll feel like a digital wizard with filters that let you sort images based on smiles, open or closed eyes, and poses. 

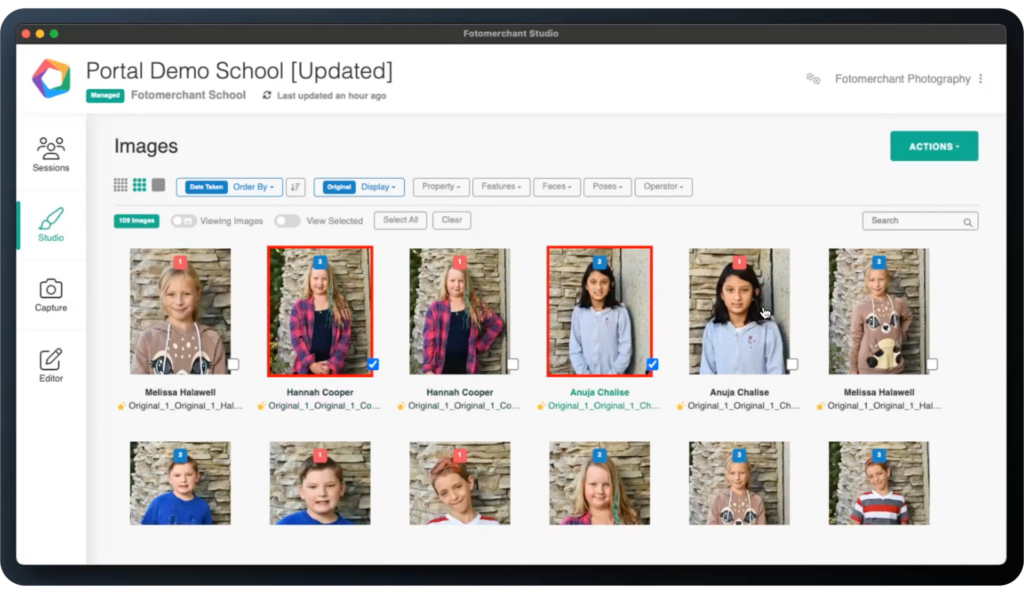
But hold on, because there’s a trick up our sleeve! Our multi-select magic lets you swiftly glide through multiple images with a single click and easily cull images with eyes closed, etc. Say goodbye to tedious clicks; say hello to efficiency.

Facial Recognition and Group Organization – The Dream Team

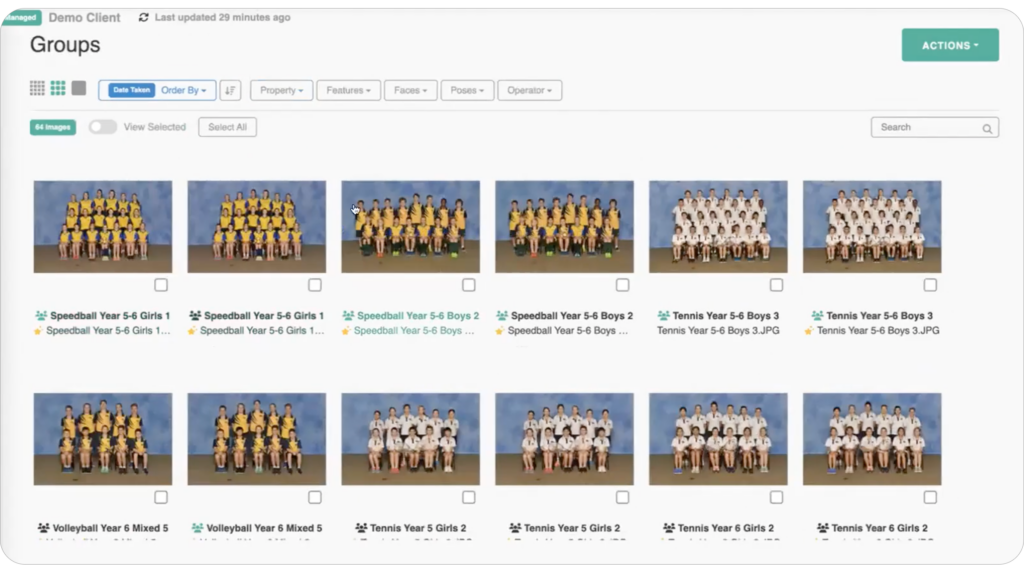
Let’s talk about facial recognition. It’s about to make your group organization game so much stronger. Have you ever imagined effortlessly matching faces to names without battling typos and data messes? Dream no more. With facial recognition, dealing with groups is now a breeze. You can give rows names, assign positions, and witness Studio efficiently organize chaos. We know the data schools provide isn’t always top-notch, so let Studio help you understand it! 

And guess what? Every change you make within Studio will automatically occur across the whole Fotomerchant ecosystem. Yep, this includes both Commerce and Portal. Brilliant right?  No need to do the whole import/export dance! We’ve got you covered. 

Template Editor – Unlock Your Inner Artist

Prepare to have your mind blown by the template editor. This is where you can craft stunning ID cards, memory mates, certificates, and more, all with your unique touch. But wait, there’s more! Advanced rules that put you in control: dynamic logos, color shifts, and text transformations. This is the place where your artistic vision and Studio’s tech prowess come together in harmony. 

Mastering Shortcuts 

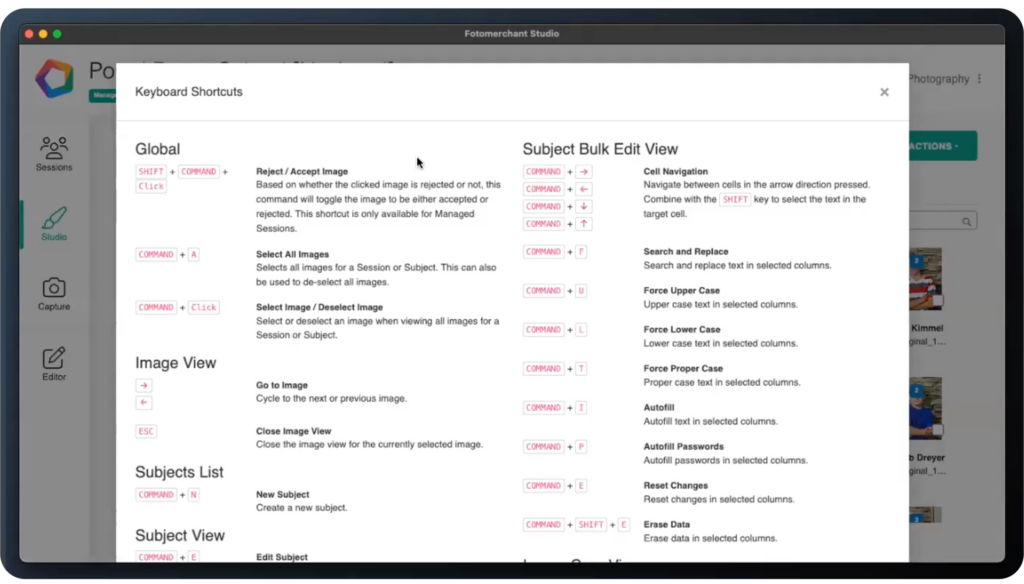
If you’re all about efficiency, you’ll love Studio’s keyboard shortcuts. Zip through subjects, choose poses and perform bulk actions with just a few clever key presses. Watch our recent webinar to learn how you can access this holy grail of Studio shortcuts. Oh, and don’t worry, we’ve accounted for both Apple and Windows users! 

And there you have it. Your crash course in Studio 101! From mastering image management to becoming a group organization maestro or even creating unique templates, Studio’s got your back. 

That’s just scratching the surface of what Studio can do. Watch our webinar hosted by Christian Perry and Tearah Fox to see a more in-depth Studio deep dive.

Facial Recognition and Face Collation

Welcome back to the third part of our thrilling facial recognition deep dive. Can you believe we’ve made it this far? Time flies when you’re having fun. And speaking of time, today we’re going to explore a treasure trove of memories and revenue potential that you might not even know you possess! Let’s tug at those parents’ heartstrings!

Discover the Gold Mine

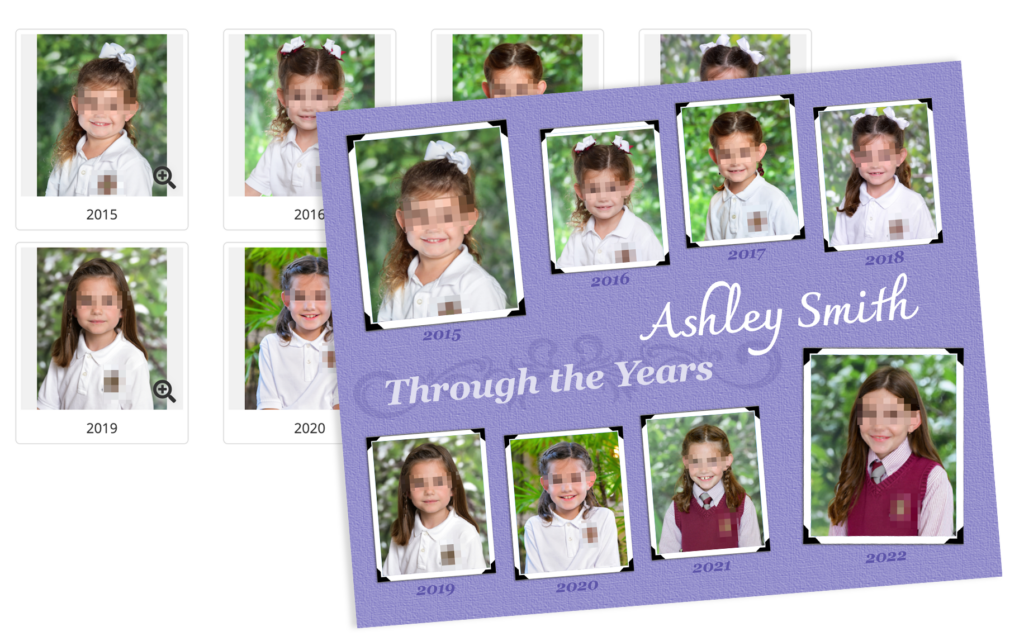
What if I told you that you were sitting on an archival gold mine? If you have worked with the same school for multiple years, you have the potential to generate timeline or journey products. By using facial recognition to create a timeline product, you can create beautiful, nostalgic photo collections that showcase the growth and development of children over time.

It’s like a visual journey through their lives, and parents absolutely love it!

Yeah, we know. Manually sorting through your back catalog of images is tedious. Thanks to the magic of facial recognition, you can now find each child’s previous images taken by your studio in seconds. Timeline products have never been easier!

What is Face Collation, and How Does it Work?

Say hello to the game-changer: Face Collation!  This fantastic feature takes facial indexing and matching to a whole new level. It allows you to identify a single photo that references each subject in your back catalog. No more sifting through years of photographs!

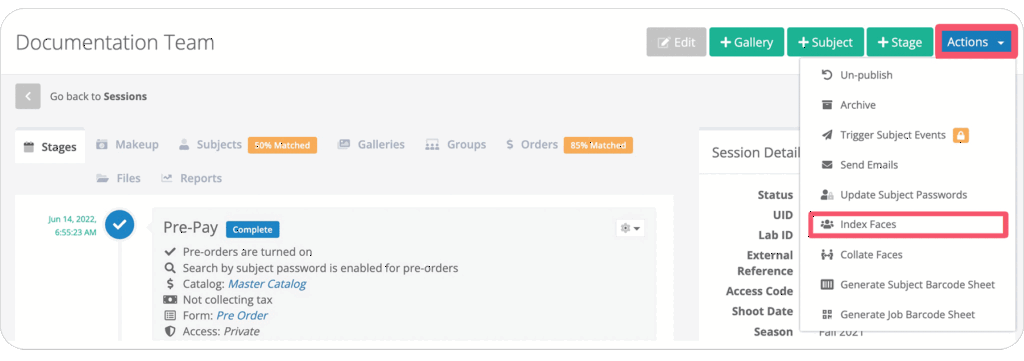
So, how does it work? Simple! You need one set of data and images, preferably the most recent year, to create the subject information with one identifying photo indexed and associated with the subject record. Then, you upload all the remaining years’ photos into an unknown gallery, ensuring all faces are indexed. Now comes the magic moment: unleash our Face Collation AI and watch it find all the photos belonging to each subject from over the years. Voilà!

That’s just a brief overview. Want to see the nitty gritty? Click here to see our knowledge base document on the feature.

Making Memories Last a Lifetime

The timeline products are just the beginning of the potential goldmine of revenue. Think about re-targeting at the end of the school year. How powerful would it be to remind parents of all the wonderful memories you’ve captured throughout their child’s year? With face collation, you can make that happen effortlessly.

Unlocking the Past

If you’ve acquired a new business and inherited a massive backlog of photos, fret not! Facial recognition and face collation are here to save you once again. Just run those old photos through the system and let the AI work its magic to match subjects and create delightful galleries to promote and sell. With this technology, you can offer personalized products that hold immense sentimental value for your customers. What’s not to love?

If we reflect on the data from our 2023 Annual School Photography report, it’s clear that the main purchasing driver for parents is to capture a moment in time. The data doesn’t lie. Start utilizing face collation to provide parents with products they really want.

So, let’s embrace the power of facial recognition and face collation. It’s the key to unlocking your archives and new opportunities to create products that touch people’s hearts and bring smiles to their faces.

To view the other blogs we have on harnessing the power of facial recognition, click here and here.

Until next time, keep capturing those precious moments!

Running Events 101

Imagine this. Colleagues push together to get snapped, and lanyards swing to and fro on the dance floor. There is an undeniable buzz in the room as the networking event kicks off in full swing. So why wait for this excitement to die down? Start selling images instantly while your eventgoers are feeling #alive. Nothing beats the excitement of seeing your pictures being dispersed in real-time.

Let me walk you through how the combination of facial recognition and capture device can have event-goers register their faces pre, mid, or post-event and instantly be linked to their images.

Better? Faster?

Yep. All of the above.

Register

The magic of our facial recognition starts here, with the registration step. Pre-event, you can have the event organizers send an email and SMS with a direct link to a super simple registry page. Here on this page, you can choose which information to collect from your subjects. Choose which details you want to add, e.g., grade, last name, or business name, every photoshoot is different, so this is customizable. Oh, and yeah, we support international numbers. Please note an individual phone number per person is required to register.

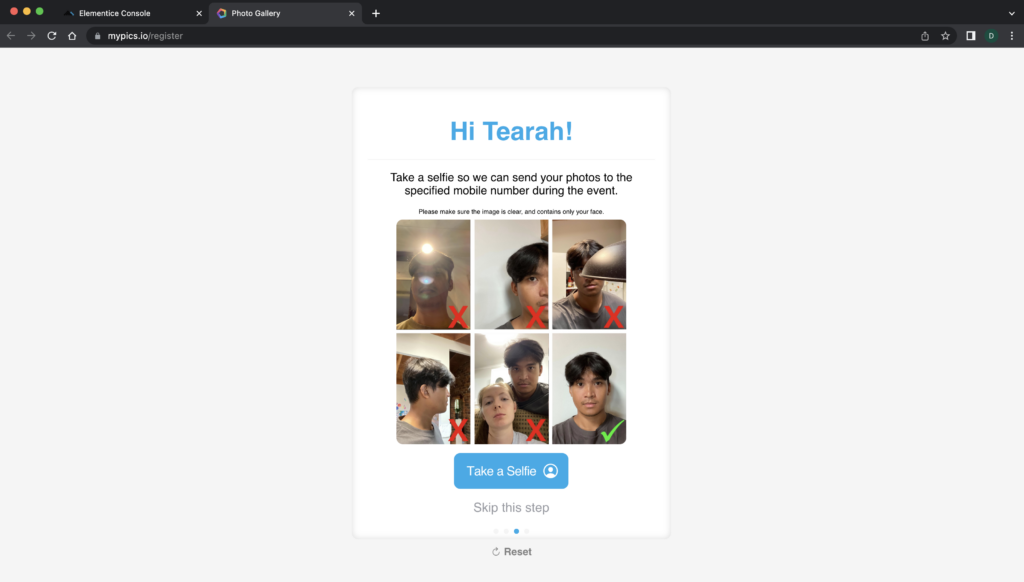
Once the subject enters all their information, they will go through a small guide that shows what not to do when capturing a selfie. This selfie will be used as a base image to identify the person. Yes to a clear front-lit image, no to a selfie taken with a group of celebrities at a miscellaneous award show.

They take a quick snap of their unique face, and boom, using facial recognition, the system will find all images taken that show that face. Pretty neat, huh? No need to manually sort through photos. Let the algorithm do the legwork for you. Welcome to the future!

Can’t disperse this register link ahead of time? Well, sorry about your luck…just kidding! You can have event goers register mid and post-event. Easily print out the QR register and display it in the venue, so all customers need to do is whip out their phones and scan to register. Once an image is submitted, they get a confirmation SMS, and then they’re off to throw down some groovy moves on the dance floor. One cool aspect is that they can still be identified if the customer registers after their image is taken. So you can leave this registration open for as long as you need and capture those busy customers post-event.

Capture. Sell. Smile.

As you snap, snap, snap away, hear the bing, bing, bings of customer phones as their images are instantly delivered. Warning: Customers may become distracted on their phones as they scroll through pictures of themselves and begin to place orders. Sounds like a good problem to have, right? Customers will be linked only to images that they are in. There is no need to scroll endlessly down extensive galleries to find the five photos of yourself with your same old awkward smile. Have them delivered straight to your customers!

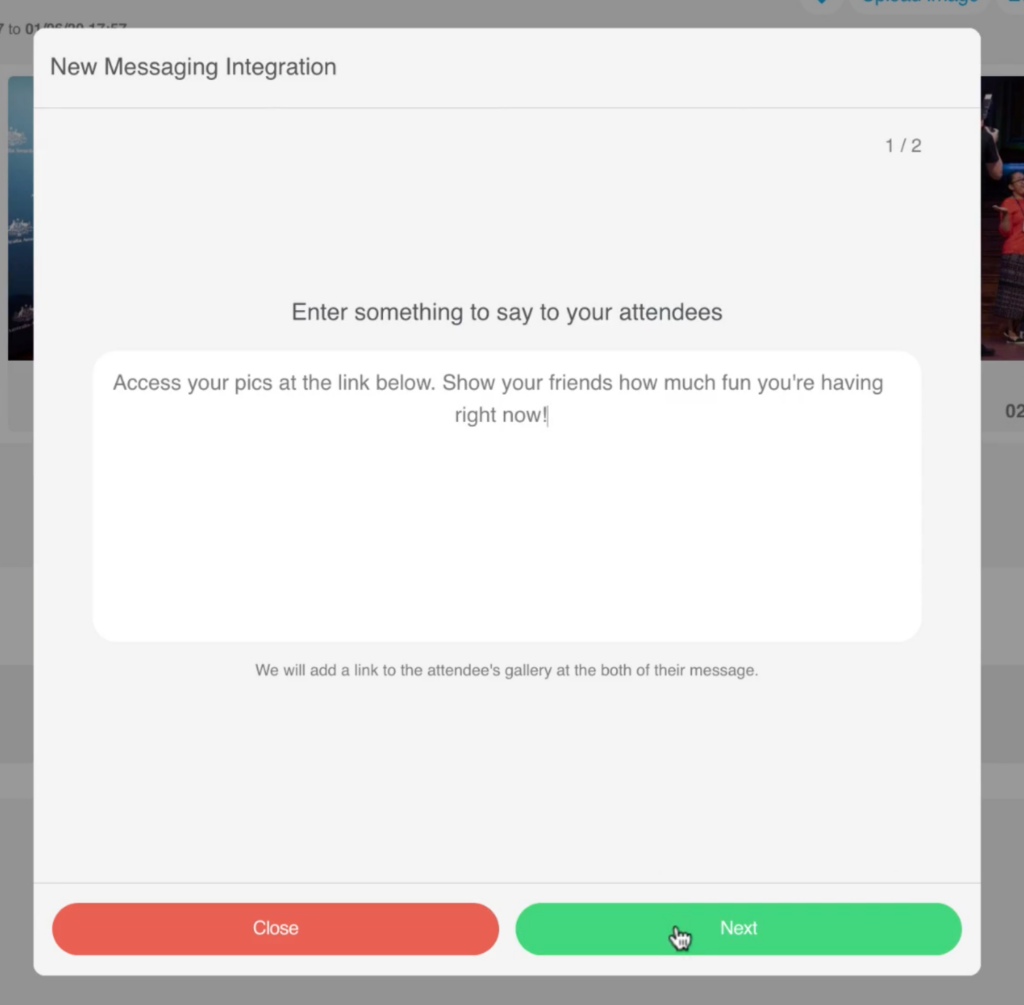
You can tweak this SMS and link to say whatever your heart desires:

You can easily search for specific customer images by filtering via their face and view the image count of their pictures. If a bad selfie was initially taken by the subject when first registering, you can quickly problem-solve this.

Of course, this type of system is not exclusive to business networking events. You can use this for graduation ceremonies, proms, comic con, and much more! If you are photographing sports events, facial recognition can be used within limits; of course, if a helmet obscures the face, this will cause issues with identification. In situations where the face may be obscured, gallery cards can become an option.

Well, that’s about all I wanted to say about facial recognition and capture! If you are entirely new to a few of the terms I mentioned in the blog above, we have an excellent knowledge base where you can learn more about capture, facial recognition, and how to adjust the SMS message and gallery cards. Our knowledge base is constantly being updated with the addition of new releases that will help to clear up any remaining questions you may have. We also have a webinar on this topic. Please reach out if you would like a demo or to learn more. Ciao!